toggle menu

My Blogs

MY Profile

Stephen G. Vinuya
Dec 11,2018

Making a Simple Space Shooter using p5.js and ES6 part 1


In this article series, we are going to create a Simple Space Shooter game in HTML5 using p5.js. 


We are going to use p5.js, a Javascript library for rendering web animations in Canvas.

To get started let us download click here.    


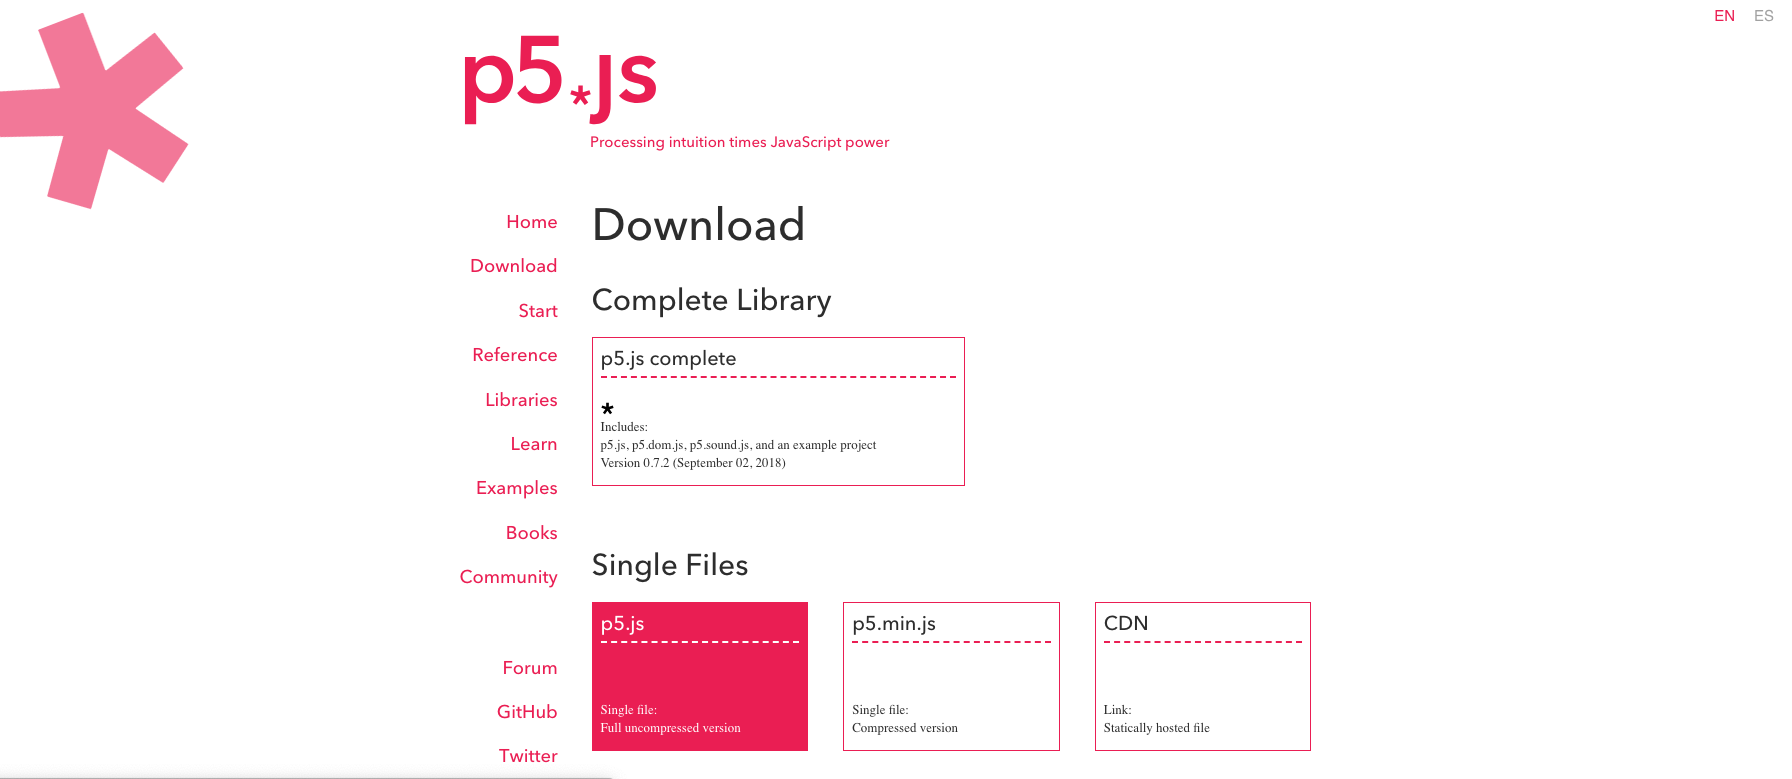
Select Complete Library > p5.js complete. 


We will use Kenney's Space Shooter Redux as our main game assets for this simple game, to download, click here.


Since we are using images to run in p5.js , we need to run it in a server, make sure that any version of MAMP, WAMP, or XAMPP is installed.


Once we have all the things we need to make our game, let's now get started.


1. Game Folder Structure

First let's make create our game folder and named it space-shooter.

After that let's create our the folders and files needed in our game.

Here's what our game folder should look like:

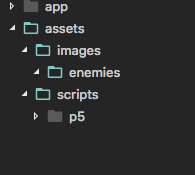
- app - will contain all our game scripts 

- assets - will contain all of our game assets and 3rd party scripts like p5.js


Next step is to move Kenney's Space Shooter Redux asset, into our game folder.

If we open it, we'll see all the assets inside it.


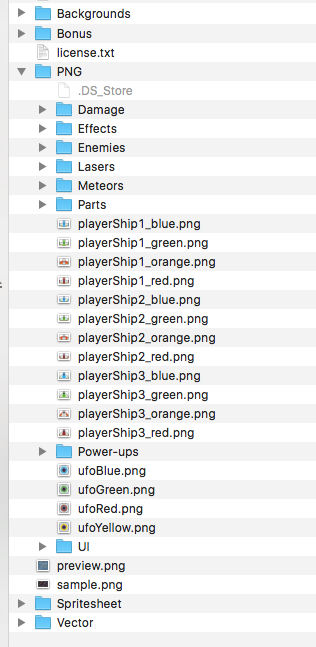
Here's the list of files that we will use and should it be named on to our app.

- PNG > playerShip1_red.png => assets > images > player.png

- PNG > Lasers > laserBlue01.png => assets > images > bullet.png

- PNG > Power-ups > star_gold.png => assets > images > star.png

- PNG > Enemies > [All Files Inside] => assets > images > enemies > [All file number 1.png to 20.png]


Our folder structure now should be: 


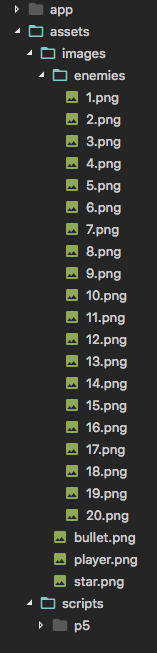
After that we are now done with the game's folder structure .


2. Setting up game scripts 

Let's now create our index.html file.

DOCTYPE html>
<html lang="en">
<head>
<meta charset="UTF-8">
<meta name="viewport" content="width=device-width, initial-scale=1.0">
<meta http-equiv="X-UA-Compatible" content="ie=edge">
<title>Space Shootertitle>
<style>
body {
display: flex;
justify-content: center;
}
</style>
head>
<body>
<script src="assets/scripts/p5/p5.min.js"></script>
<script src="scripts/sketch.js"></script>
body>
html>


After that let's now create our main script for running all p5's main functions, sketch.js,  app > sketch.js 

function preload() {

}

function draw() {
background(0);
}

function setup() {
createCanvas(450, window.innerHeight);
}


- preload() is a p5.js function that runs before setup, it is usually used for preloading all the assets(images, sounds, etc) inside the game

- draw() is a p5.js function that runs every frame, in p5.js it runs on 60 fps, so this function will be called 60 times every second.

- setup() is a p5.js function that is mainly used for initializing variables, creating canvas.

-createCanvas() is a p5.js function that will create the canvas where our game will run.

- background() is a p5.js function used for setting the canvas color.


Let's now reference, the sketch.js file on to our index.html.

<script src="assets/scripts/p5/p5.min.js"></script>
<script src="app/sketch.js"></script>


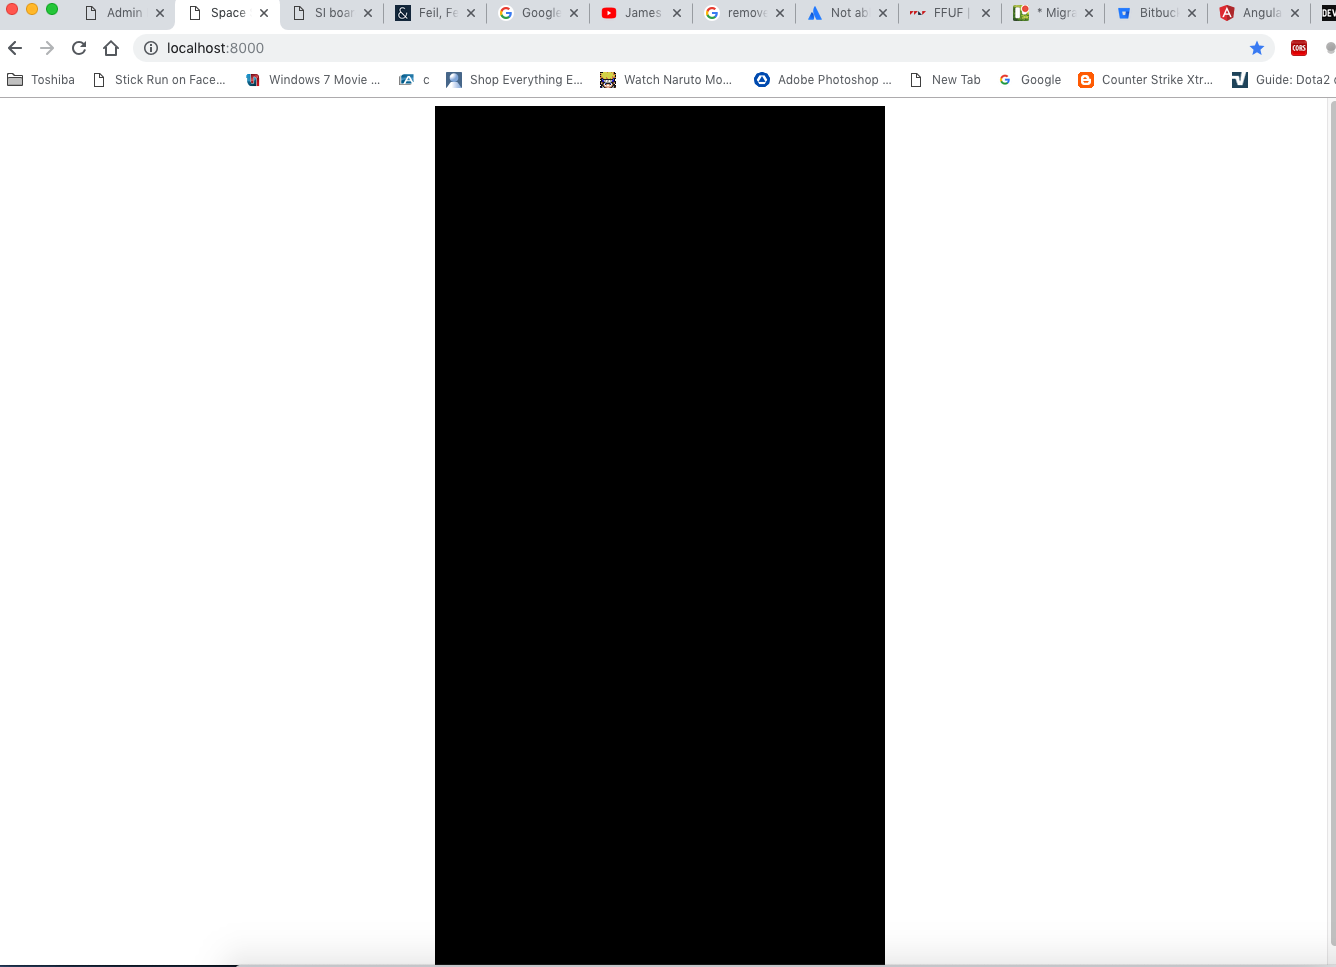
and now let's run the app by entering this command on VS code's terminal :

php -S localhost:8000

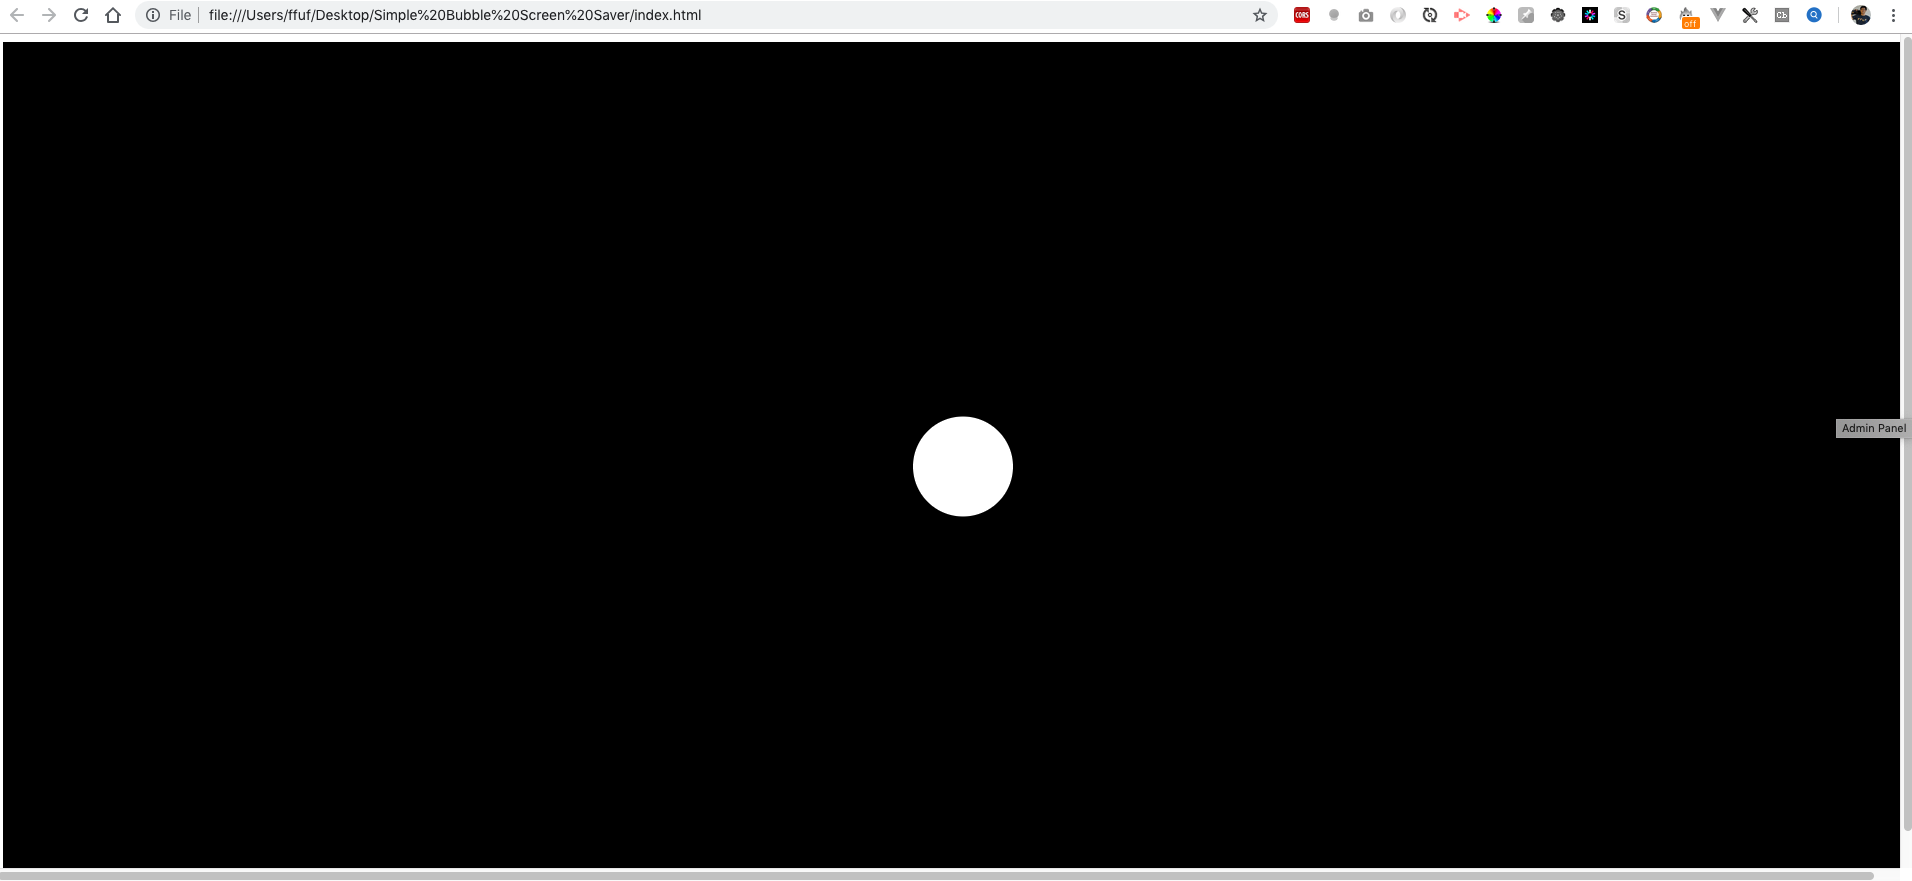
After running our game, we can see a blank black canvas on our window:


3. Asset Manager

Let's now load all the assets in our app, create app > asset-manager.js.

class AssetManager {
preload() {
this.playerImg = loadImage('assets/images/player.png');
this.bulletImg = loadImage('assets/images/bullet.png');
this.starImg = loadImage('assets/images/star.png');

this.enemiesImg = [...Array(20).keys()].map(a => loadImage(`assets/images/enemies/${a + 1}.png`));
}

}


- loadImage() - will load the image based on the path provided in the parameter, and returns p5.Image object
[...Array(20).keys()] - this code is the ES6 alternative for   for (let i = 0; i < 20; i++)  

Let's now reference, the asset-manager.js file on to our index.html.

<script src="assets/scripts/p5/p5.min.js"></script>
<script src="app/sketch.js"></script>
<script src="app/asset-manager.js"></script>


4. Game Manager and Game Object

Let's now create a GameObject class that will be the parent class of all our game entities.


class GameObject {
constructor(pos, vel, img, size, life, tag) {
this.pos = pos;
this.vel = vel;
this.img = img;
this.size = size;
this.life = life;
this.tag = tag;
}

show() {
push();
imageMode(CENTER);
translate(this.pos.x, this.pos.y);
image(this.img ,0 ,0 ,this.size.x, this.size.y);
pop();
}

update() {
this.pos.add(this.vel);
}

}

- Our GameObject class will keep track of :
  -position (pos) - x,y coordinates of the object in the canvas

  -velocity (vel) - keeps track of the x, y movement of the object in the canvas.

  - image (img) - the sprite image of the game object from the AssetManager class.

  - size (size) - the width and height size of the game object

  - life (life) - keeps track of the life of game object

  - tag (tag) - tag name to keep track on what time of game object is created.


GameObject's methods:

 - show() - render the game object inside the canvas.

   - push and pop - is a p5.js function that indicates start and end of positioning.

   - imageMode - takes parameter CORNER, CENTER ,CORNERS,  for displaying the image

   - translate - takes two parameter (x, y) to position the image.

   - image - displays the image in the canvas.

- update() - updates game object position in the canvas

   this.pos.add(this.vel) - adds the velocity to make the game object move.


Let's now reference, the game-object.js file on to our index.html.

<script src="assets/scripts/p5/p5.min.js"></script>
<script src="app/sketch.js"></script>
<script src="app/asset-manager.js"></script>
<script src="app/game-object.js"></script>


Now let's create our player class.

class Player extends GameObject {

constructor(pos, vel, img, size, life, tag) {
super(pos, vel, img, size, life, tag);
this.fireRate = 10;
this.damage = 20;
this.bulletSpeed = 15;
}
}
}


It will extend the GameObject class, and add these properties: 

 -  fireRate - in every frames our player will shoot bullets

 - damage - variable that indicates the player damage to enemies

- bulletSpeed - speed of the bullet that will traverse through the canvas


Let's now reference, the player.js file on to our index.html.

<script src="assets/scripts/p5/p5.min.js"></script>
<script src="app/sketch.js"></script>
<script src="app/asset-manager.js"></script>
<script src="app/game-object.js"></script>
<script src="app/player.js"></script>


Now let's create a GameManager class to manage all of our game objects.
class GameManager {

constructor() {
this.assetManager = new AssetManager();
}

init() {
this.player = new Player(
createVector(width / 2, height - 100),
createVector(0, 0),
this.assetManager.playerImg,
createVector(75, 75),
100,
'player'
);
}

loadAssets() {
this.assetManager.preload();
}

update() {
this.renderPlayer();
}

renderPlayer() {
this.player.pos.x = constrain(mouseX, 37.5, width - 37.5);
this.player.update();
this.player.show();
}

}


- init() - will be called when the game starts, we will instantiate the player, with 0,0 velocity, cause we want the mouse to make the movement for the player

- loadAssets()  - will be called on p5 preload() function, to load all the assets that will be used in our game

- update() -will call all the game objects and render them one by one.

- renderPlayer() - will be called every update and player will follow the mouse position in the screen clamped at playerWidth / 2 and width - playerWidth / 2

 
And now let's update our sketch.js file, to call respective gameManager methods in each p5.js lifecycle methods.

let gameManager;

function preload() {
gameManager = new GameManager();
gameManager.loadAssets();
}

function draw() {
background(0);
gameManager.update();
}

function setup() {
createCanvas(450, window.innerHeight);
gameManager.init();
}


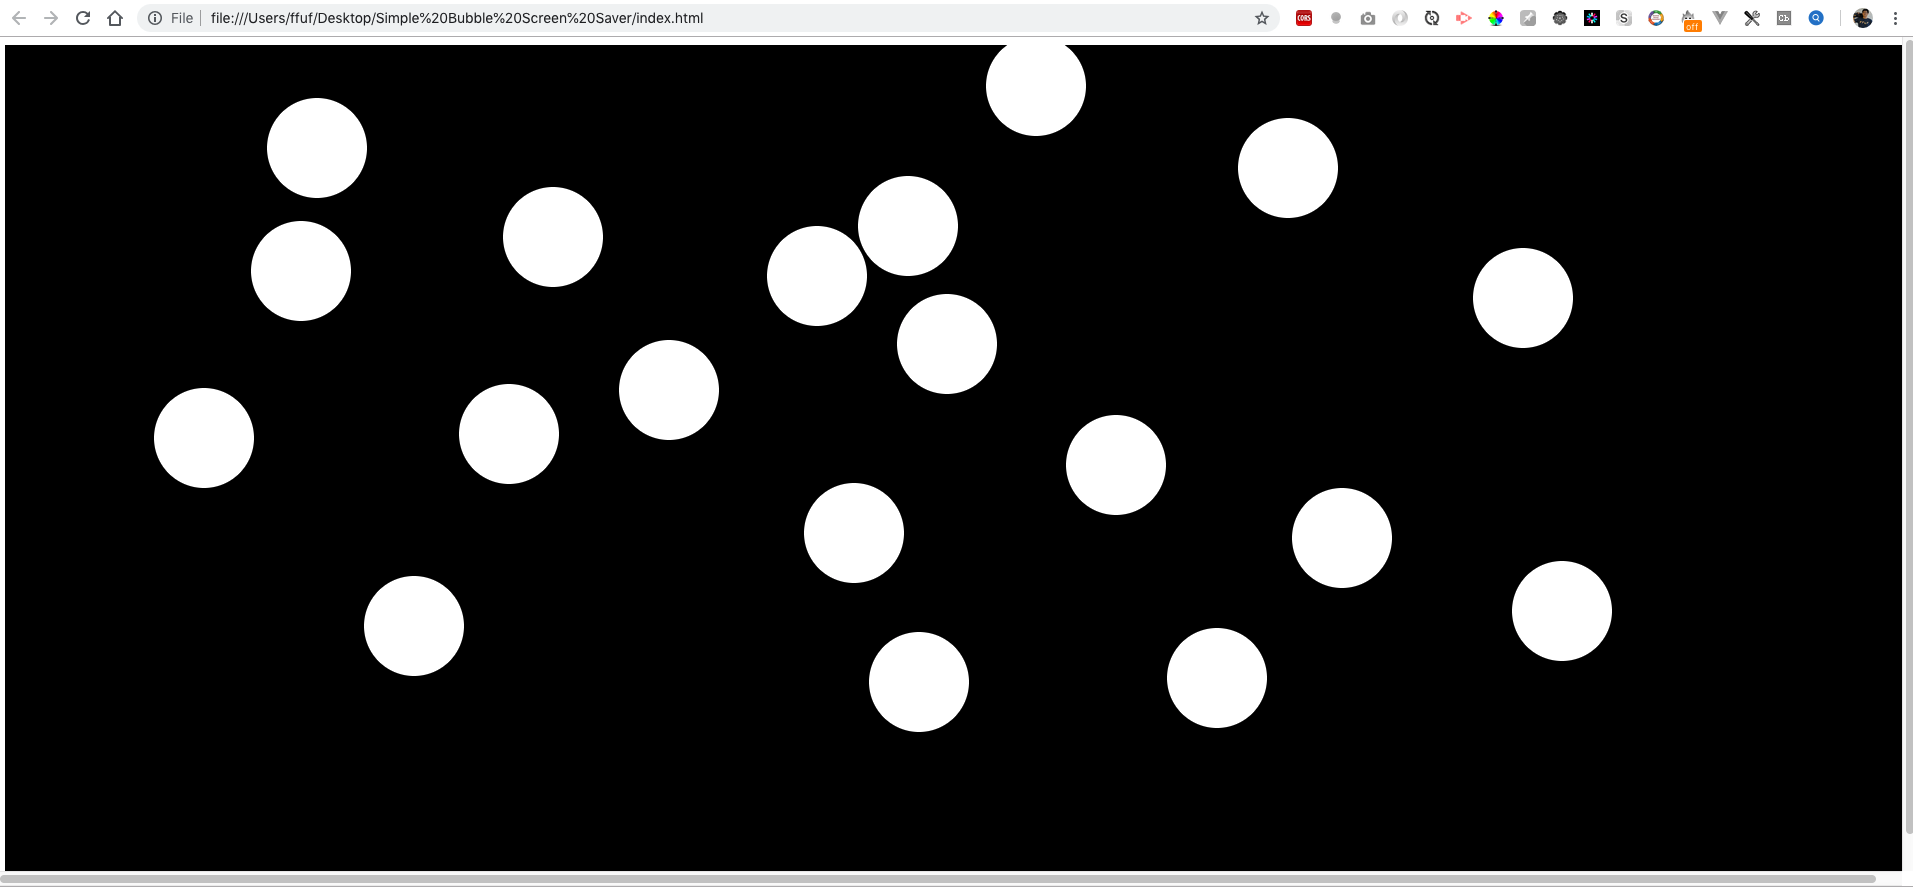
After we run our game we can see this :


Cool, now we can see our player moving.

That concludes our part 1 of this article series.

Next Article: http://onecompileman.com/blogs/6


Read More
MY Profile

Stephen G. Vinuya
Dec 07,2018

Solving Code Wars Problem in Javascript (ES6) [6th Kyu]


In this article we are going to solve 2 Codewars' [6th kyu ] problems using Javascript (ES6) and  discuss approaches how problems can be solved .

Codewars is a great site for improving your problem solving skills and it's also great for discovering different approaches of other developers in solving each problems.

Problems at code wars are label by difficulty as kyu, [1st kyu] being the hardest and [8th kyu] being the easiest.


Let's now start with our first problem.


1. Matrix Addition

Codewars link: https://www.codewars.com/kata/matrix-addition/train/javascript

The problem is :


Write a function that accepts two square matrices (N x N two dimensional arrays), and return the sum of the two. Both matrices being passed into the function will be of size N x N (square), containing only integers.

How to sum two matrices:

Take each cell [n][m] from the first matrix, and add it with the same [n][m] cell from the second matrix. This will be cell [n][m] of the solution matrix.

Visualization:

|1 2 3| |2 2 1| |1+2 2+2 3+1| |3 4 4|
|3 2 1| + |3 2 3| = |3+3 2+2 1+3| = |6 4 4|
|1 1 1| |1 1 3| |1+1 1+1 1+3| |2 2 4|


The solution:

Non ES6 approach: 


function matrixAddition(a, b) {
var m = []; // Matrix var for the sum of a + b
for (var r = 0; r < a.length; r++) {
m.push([]); // adds 1d array into the array to make it 2d
for (var c = 0; c < a[r].length; c++) {
m[r].push(a[r][c] + b[r][c]); // sum of each cell in a and b matrix
}
}

return m;
}


We have created m as the variable that will hold the sum of cells in both a and b in same row and col.

And every row iteration we are adding an empty 1d array to m, so that we can store the sum of same cells for both a and b.


And would you believe the approach above can be reduced into a single line of code?


ES6 Approach: 


const matrixAddition = (a, b) => a.map((a1, r) => a1.map((a2, c) => a2 + b[r][c]));


In this approach we have used arrow function of Javascript, to omit the function() keyword, to make it more shorter.

Also using arrow function would omit the return keyword.

We have used map here to mutate the matrix's value, and we have another inner map since we are dealing with 2d  array here.

Same as our solution above we have  and c which denotes the row and column of the cells we are adding .


2. Find the unique number

Codewars link: https://www.codewars.com/kata/find-the-unique-number-1/train/javascript

The problem is :

There is an array with some numbers. All numbers are equal except for one. Try to find it!

findUniq([ 1, 1, 1, 2, 1, 1 ]) === 2
findUniq([ 0, 0, 0.55, 0, 0 ]) === 0.55

It's guaranteed that array contains more than 3 numbers.

The tests contain some very huge arrays, so think about performance.

This is the first kata in series:


The solution:

Non ES6 approach: 

function findUniq(arr) {
var uniqObj = {}; //Stores all unique elements in array

arr.forEach(function (a) {
if (uniqObj.hasOwnProperty(a)) { //checks if the element in array exist already in the object as key
uniqObj[a] = true; // modify its value to true if exists already, meaning its unique
} else {
uniqObj[a] = false; // otherwise initialize it to false
}
});

var keys = Object.keys(uniqObj); // Gets all the keys in the Object

for (var i = 0; i < keys.length; i++) {
if (!uniqObj[keys[i]]) { // checks if the property value if false, if it is then it is unique
return parseInt(keys[i]); // return the key, parsed into integer
}
}
}


uniqObj is a variable that will hold the unique elements in the array as key.


hasOwnProperty() is an Object method that returns a boolean value if the key already exist in the object or not, if it exists we are setting it to true meaning the it is not unique, otherwise initialize it to false.


Object.keys() gets all the keys inside the object needed to iterate into the object values to find false in it, meaning it is a unique number then return the parseInt value of that key.


ES6 Approach: 

const findUniq = (arr) => {
const obj = arr.reduce((acc, a) => {
acc[a] = acc.hasOwnProperty(a);
return acc;
}, {});
return arr.reduce((acc, a) => (!obj[a] ? +a : acc), 0);
}


Uses the same idea as we did above, but instead of declaring a var uniqObj and using forEach to accumulate its value, we used reduce() instead, as well as to finding which key is the only unique number.

Instead of using if in checking to the unique number, we used a ternary operator.

We also change parseInt(strNumber) into +strNumber, which is the shorthand for parsing int.


That ends our article in Solving 6th kyu Codewars problem using ES6.


Check out the 7th kyu version of this article: http://onecompileman.com/blogs/3


Read More
MY Profile

Stephen G. Vinuya
Dec 06,2018

Solving Code Wars Problem in Javascript (ES6) [7th Kyu]


In this article we are going to solve 3 Codewars' [7th kyu ] problems using Javascript (ES6) and  discuss approaches how problems can be solved .

Codewars is a great site for improving your problem solving skills and it's also great for discovering different approaches of other developers in solving each problems.

Problems at code wars are label by difficulty as kyu, [1st kyu] being the hardest and [8th kyu] being the easiest.


Let's now start with our first problem.


1. Sort array by string length

Codewars link:  https://www.codewars.com/kata/sort-array-by-string-length/train/javascript

The problem is :


Write a function that takes an array of strings as an argument and returns a sorted array containing the same strings, ordered from shortest to longest.

For example, if this array were passed as an argument:

["Telescopes", "Glasses", "Eyes", "Monocles"]

Your function would return the following array:

["Eyes", "Glasses", "Monocles", "Telescopes"]
All of the strings in the array passed to your function will be different lengths, so you will not have to decide how to order multiple strings of the same length.

The solution:

Non ES6 approach: 

function sortByLength (array) {
return array.sort(function(a, b) {
return a.length - b.length; // sort it by ascending order based from string's length
});

}


We used Javascript's sort() function here which takes a callback function as an optional parameter for sorting.

Since we are comparing the length of the string as the basis for sorting, we used length property of the string.

a.length - b.length  this will be sorted in ascending order,

if we want it in descending order we just have to reverse the expression b.length - a.length


Would you be believe that our solution above can be reduced into a line of codes?

ES6 approach:


const sortByLength = (array) => array.sort((a, b) => a.length - b.length);


What's new here is ES6's arrow function, click here to learn more about arrow functions.


2. Flatten and sort an array

Codewars link:  https://www.codewars.com/kata/57ee99a16c8df7b02d00045f

The problem is :


Challenge:

Given a two-dimensional array of integers, return the flattened version of the array with all the integers in the sorted (ascending) order.

Example:

Given [[3, 2, 1], [4, 6, 5], [], [9, 7, 8]], your function should return [1, 2, 3, 4, 5, 6, 7, 8, 9].

Addendum:

Please, keep in mind, that JavaScript is by default sorting objects alphabetically. For more information, please consult:

http://stackoverflow.com/questions/6093874/why-doesnt-the-sort-function-of-javascript-work-well


Non ES6 approach: 

function flattenAndSort(array) {
array = array.reduce(function (acc, a) {
return acc.concat(a);
}, []);

return array.sort(function (a, b) {
return a - b;
});
}


We used reduce() array method to transform the 2d array into 1d array. 

acc stands for accumulator in reduce wherein it is initialized as empty array, concat() the array every iteration.

Again we can reduce the solution above into a single line of code.


ES6 Approach:


const flattenAndSort = array => [].concat(...array).sort((a, b) => a - b);


What we have used new here is this operator "...", which is called Spread Operator

Spread Operator, flattens and spreads the array content. To learn more click here 


3. The Office I - Outed

Codewars link:  https://www.codewars.com/kata/the-office-i-outed/train/javascript

The problem is :

Your colleagues have been looking over you shoulder. When you should have been doing your boring real job, you've been using the work computers to smash in endless hours of codewars.

In a team meeting, a terrible, awful person declares to the group that you aren't working. You're in trouble. You quickly have to gauge the feeling in the room to decide whether or not you should gather your things and leave.

Given an object (meet) containing team member names as keys, and their happiness rating out of 10 as the value, you need to assess the overall happiness rating of the group. If <= 5, return 'Get Out Now!'. Else return 'Nice Work Champ!'.

Happiness rating will be total score / number of people in the room.

Note that your boss is in the room (boss), their score is worth double it's face value (but they are still just one person!).


Non ES6 approach:


function outed(meet, boss) {

let avg = Object.keys(meet).reduce(function (acc, k) {

if (k === boss) {
acc += meet[k] * 2;
} else {
acc += meet[k];
}

return acc;
}, 0) / Object.keys(meet).length;


if (avg <= 5) {
return 'Get Out Now!'
} else {
return 'Nice Work Champ!';
}
}


We have used Object.keys() to get meet object keys, which we will need to compare if the person is the boss or not.

If boss multiply it by 2, after accumulating the sum of all team members, divide it by length of keys inside the meet  object to get the average.

After getting the avg check if <= 5 and return the necessary statement.


ES6 Approach:

const outed = (meet, boss) => {

const avg = Object.keys(meet).reduce((acc, k) => (
acc += (k === boss) ? meet[k] * 2 : meet[k]
), 0) / Object.keys(meet).length;

return (avg <= 5) ? 'Get Out Now!' : 'Nice Work Champ!';
}


We still used the arrow function here and some ternary operator to make the condition much more shorter.

That ends our article, there's a lot of possible code improvements when using ES6.


Read More
MY Profile

Stephen G. Vinuya
Dec 05,2018

Making Simple Bubble Screensaver Animation using p5.js part 2


This is the continuation from the part 1 of this article series.


What we have accomplished here so far is adding of bubbles with random color and radius on mouse click.

Next step is to make those bubble move around the screen, to do that we need to keep track of bubbles x, y location and as well as its velocity.


1. Creating a bubble object 

We need to create a bubbles variable to contain all the bubbles that has been added to our canvas.


var bubbles = [];

function setup() {
createCanvas(windowWidth, windowHeight);
background(0);
}


Next is to create a Bubble Object that will contain position, velocity, color, radius.


var Bubble = (function () {

function Bubble(pos, vel, col, radius) {
this.pos = pos;
this.vel = vel;
this.col = col;
this.radius = radius;
}

return Bubble;
})();


Next is to add show function in it, which is the same code we have in the mousePressed() function

var Bubble = (function () {

function Bubble(pos, vel, col, radius) {
this.pos = pos;
this.vel = vel;
this.col = col;
this.radius = radius;
}

Bubble.prototype.show = function () {
noStroke();
fill(this.col);
ellipse(this.pos.x, this.pos.y, this.radius, this.radius);
}

return Bubble;
})();


Now let's move to our mousePressed() function and add new bubble object in the bubbles variable we have.

function mousePressed() {
const pos = createVector(mouseX, mouseY) // x, y
const vel = createVector(0 , 0);
const col = (color(
random(0,255), // min, max
random(0,255),
random(0,255)
));
const radius = random(50,150);

bubbles.push(
new Bubble(pos,vel,col,radius)
);
}


createVector()  takes 3 argument x, y, z which is the coordinates of our bubble, since we are doing this on 2d we are going to ignore z axis


If you try to run this now on our browser, you'll see nothing is displayed on the canvas, its because we have to loop and display all the bubbles.


On our draw() and setup() function, let's display all bubbles that has been created.

function setup() {
createCanvas(windowWidth, windowHeight);
}

function draw() {
background(0);
bubbles.forEach((bubble) => {
bubble.show();
});
}

If you run this on the browser we get to see same results as to our part1 of this article series. But what has improved or change, if we still get the same results?

In this case its easier to keep track and manipulate each bubble's properties since its already wrapped in an Object.


2. Making the Bubbles move

Next step is making our bubbles move, which a lot more easier than you think.

On our bubble object let's add an update() function that adds the velocity to our position, to make the bubbles move.

var Bubble = (function () {

function Bubble(pos, vel, col, radius) {
this.pos = pos;
this.vel = vel;
this.col = col;
this.radius = radius;
}

Bubble.prototype.show = function () {
noStroke();
fill(this.col);
ellipse(this.pos.x, this.pos.y, this.radius, this.radius);
}

Bubble.prototype.update = function () {
this.pos.add(this.vel);
}

return Bubble;
})();


On our mousePressed()  function let's add a random velocity to our bubble, every mouse click

function mousePressed() {
const pos = createVector(mouseX, mouseY) // x, y
const vel = createVector(random(-4,4),
random(-4,4));
const col = (color(
random(0,255), // min, max
random(0,255),
random(0,255)
));
const radius = random(50,150);

bubbles.push(
new Bubble(pos,vel,col,radius)
);
}


And call the update() function of the bubble on draw

function draw() {
background(0);
bubbles.forEach((bubble) => {
bubble.update();
bubble.show();
});
}


If we run this on browser, here's the output.


Next step, is to make the bubbles not to leave the canvas when it hit the edges.


3.  Making bubbles stay at the screen

Let's write an edges() function inside the Bubble object, which detects and inverses the velocity if it hits the edges of the canvas.

And let's call the edges() function inside the update() function.

var Bubble = (function () {

function Bubble(pos, vel, col, radius) {
this.pos = pos;
this.vel = vel;
this.col = col;
this.radius = radius;
}

Bubble.prototype.show = function () {
noStroke();
fill(this.col);
ellipse(this.pos.x, this.pos.y, this.radius, this.radius);
}

Bubble.prototype.update = function () {
this.pos.add(this.vel);
this.edges();
}

Bubble.prototype.edges = function () {
if (this.pos.x - (this.radius / 2) < 0 || this.pos.x + (this.radius / 2) > width) {
this.vel.x *= -1;
}

if (this.pos.y - (this.radius / 2) < 0 || this.pos.y + (this.radius / 2) > height) {
this.vel.y *= -1;
}
}

return Bubble;
})();


After running, we can now see this as our final result.


Source code: https://github.com/onecompileman/simple-bubble-screen-animation

Try it here: https://www.openprocessing.org/sketch/631480


Read More
MY Profile

Stephen G. Vinuya
Dec 03,2018

Making Simple Bubble Screensaver Animation using p5.js part 1


In this article we are going to make a simple Bubble screen saver like animation in HTML5.


We are going to use p5.js, a Javascript library for rendering web animations in Canvas.

To get started let us download click here.    


Select Single Files > p5.js. 


After that we can now start coding this simple animation.


1. Place the downloaded p5.js file in our project folder, create two files in it named sketch.js and index.html

The folder structure should be like this: 


index.html - Referenced the 2 js files inside the project

DOCTYPE html>
<html lang="en">
<head>
    <title>Simple Bubble Screen savertitle> head>
<body>
    <script src="p5.js">script>
    <script src="sketch.js">script> body>
html>


sketch.js 

function setup() {
createCanvas(windowWidth, windowHeight);
}

function draw() { background(0);
}    


setup() and draw() are the two main functions in p5.js

setup - in p5.js being called once here after the document has loaded.

- draw - is being called every frame per second(fps), 

- createCanvas(windowWidth, windowHeight) - creates a canvas on our HTML, where we render our bubble animation with the size same as the window.

- background(0) - Renders black colored canvas


2. Creating bubbles

Let's add a bubble on our canvas, using the ellipse function

function draw() {
background(0);
fill(255); // Fills the bubble with white color
noStroke(); // Remove the border of the bubble
ellipse(width / 2, height / 2, 100,100); // x, y, radiusX, radiusY
}


width / 2 and height / 2 makes our bubble be at the center of our screen


Let's open our index.html and try to see in browser, what our web animation currently looks like.

Cool, now we have our first bubble, the next step would be adding bubbles, every time the mouse is Pressed on the screen.

We are going to use p5.js function mousePressed(), to keep track of mouse clicks on the canvas.


Let's move the background(0), in the setup() for the mean time 

function setup() {
createCanvas(windowWidth, windowHeight);
background(0);
}


Leave the draw() function as blank.

function draw() {

}


And let's create bubble every mouse click.

function mousePressed() {
fill(255); // Fills the bubble with white color
noStroke(); // Remove the border of the bubble
ellipse(mouseX, mouseY, 100, 100); // x, y, radiusX, radiusY
}


mouseX and mouseY is current mouse position in the screen after we clicked the canvas.


After running and playing with mouse clicks, we should see something like this.


Let's try playing with this some more, by using random() function of p5.js.

function mousePressed() {
fill(color(
random(0,255), // min, max
random(0,255),
random(0,255)
));
noStroke(); // Remove the border of the bubble
const radius = random(50,150);
ellipse(mouseX, mouseY, radius, radius); // x, y, radiusX, radiusY
}


- random() accepts two parameters the min and max value range to randomize

color() accepts the rgb values


Let's run it again and try playing with it.


Cool! now we have something like this, next step is to make it move.

Next article: http://onecompileman.com/blogs/2


Read More